A. Introduction
1. Measurement Limitation
A measurement consists of comparing an unknown quantity to a known quantity. Known quantities are the instruments with which we make measurements. Whether instruments are based on physical comparisons, such as a tape, or electronic, such as GPS, there are limits to both their construction and resolution.
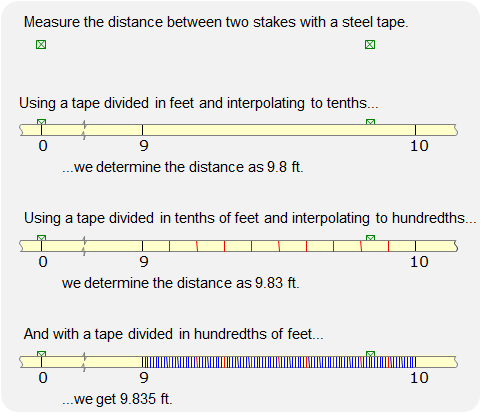
Consider the example illustrated in Figure A-1:
 |
|
Figure A-1 |
We could go on. As equipment resolution changes so the does the degree of our measurement certainty. Can we ever determine the “exact” distance between the two stakes? Theoretically we could to a certain resolution, but what if our tape was off due to a temperature change? What if we didn’t align the 0 end correctly? What if the divisions on our tape weren't consistent? What about the physical marks between which we measure?
Everything conspires against us.
We can make the following observations about measurements:
- No measurement is exact.
- Every measurement contains errors.
- The true value of a measurement is never known.
From those three statements we can then deduce that the exact error present in a measurement is unknown.
2. Measurement Quality
Precision and accuracy are two words which, while often used interchangeably, mean something different in terms of measurement errors.
Precision has to do with repeatability, that is, if we measure the same thing a number of times, how close are the measurements to each other? Precision is related to errors but can act to hide them also. For example if we measured the distance between the stakes three times and get 9.84. 9.83, 9.84, we might feel pretty confident in the results - repeatability is good. But what if we later find out the guy at the other end of the tape was holding 1.0 on the first stake instead of 0.0?
Accuracy is the nearness to the true value. This relates directly to the error amount present in a measurement. Since we’ve already stated that the amount of error present in a measurement is unknown, then the true accuracy of a measurement is unknown. Although we don’t know how much error is present, we can minimize it. While the precision of the three measurements in the previous paragraph was good, their overall accuracy was not.
Accuracy is also related to instrument resolution. We often use this to express an accuracy level for a measurement. For example, the manufacturer may state a least count of 5 seconds for a total station. We could say that our angle accuracy limit is the least count (that’s not strictly true, but close enough) and errors smaller than that wouldn’t be significant.
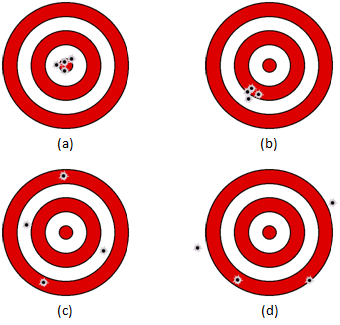
The traditional target example, Figure A-2, is a good way to get a handle on the relationship between precision, accuracy, and error.
 |
| Figure A-2 Accuracry and Precision |
In Figure A-2:
- Target (a) represents a shot pattern that is both precise (close grouping) and accurate (average is on the bull’s-eye).
- Target (b) has a shot pattern that is precise (close grouping) but not accurate (average is not on the bull’s-eye).
- Target (c)’s shot pattern is not precise (the shots are scattered) but it is accurate (the average of the shot group would fall on the bull’s-eye).
- And target (d), well, the shot group is neither precise (shots all over the place) nor accurate (average is not near the bill’s-eye).
Going back to our earlier example of three distance measurements (9.84, 9.83, 9.84) and holding 1.0 instead of 0.0 on the first stake, we have a condition similar to target (b): precise, but not accurate.