2. Application
In a nod to tradition, the taping process is often called chaining. The tape itself is sometimes referred to as a chain, the lead person the head chainperson, the following the rear chainperson.
a. Tape types
There are two types of tapes: cut and add. Both are marked and label at one foot intervals with only a single foot near the beginning divided into 1/10's and 1/100's (some have the last foot subdivided also). When measuring a distance, the zero end of the tape leads. This allows direct partial tape readings with minimal mental math.
A cut tape has the first foot, from 0 to 1, subdivided. It is 100 feet long, Figure E-2.
|
|
| Figure E-2 Cut Tape |

An add tape has an additional foot past 0 that is divided. It is 101 feet long, Figure E-3.
|
|
| Figure E-3 Add Tape |

An cut tape is so called because the partial foot reading at the forward mark is cut (subtracted) from the full foot held at the back mark, Figure E-4.
|
63' - 0.76' = 62.24' |
|
Figure E-4 |

With an add tape, the partial foot reading at the forward mark added to the full foot held at the back mark, Figure E-5.
|
62' +0.24' = 62.24' |
| Figure E-5 Reading an Add Tape |

b. Typical equipment
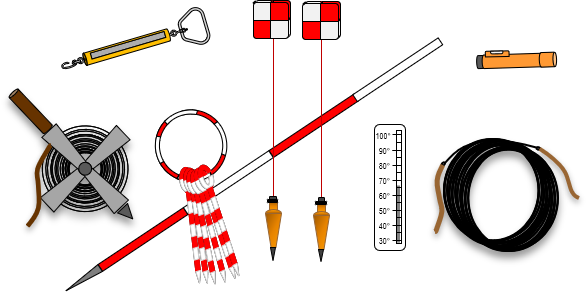
A taping crew would generally be equipped with a tape (on a reel or thrown), chaining pins (aka, arrows), plumb bobs, range poles, hand level, and tension handle, Figure E-6.
|
|
| Figure E-6 Taping Equipment |
For precise base line measurement, a taping buck (a small tripod) would be used instead of chaining pins for intermediate marking. The the tape would be made of invar, a material with lower thermal expansion than steel, and stored on a larger reel to minimize curling.
c. Taping
Taping as a primary accurate distance measuring method has largely been replaced by electronic and satellite-based methods. Because of that, this section presents only a general overview of the process. Most surveying text books describe the procedure in much more detail if the reader is interested.
If the terrain between points is flat and obstruction-free, the tape can be laid on the ground, Figure E-7(a). If the terrain slopes or is irregular, the tape must be suspended at one or both ends to measure horizontally, Figure E-7(b).
|
|
| (a) Fully Supported |
|
|
| (b) End Support |
| Figure E-7 Terrain Effect |


The hand level helps determine how high to hold the tape for horizontal measurement and the plumb bob to orient over a point; it is used by the downhill chainperson, Figure E-8.
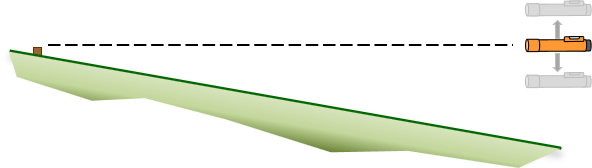 |
| Figure E-8 Using a Hand Level |
The range pole is placed behind the forward point and the rear chainperson uses it to visually keep the forward chainsperson on line.
Sufficient pull must be applied to properly stretch the tape as well as minimize sag when the tape is suspended at its end(s). These are more fully explained in the Errors section.